by James | Oct 30, 2022 | Welding
If you are looking for a career in welding, you may be wondering how much welders make in California. Here we will discuss the average salary of welders in the state, including seniority and experience. You’ll also learn the average salary of welders in different cities across California.
There are different kinds of welding opertions and had an impact on welder salary. Like here you can read the complete guide on how much underwater welders make. It will help you to get a clear idea of the salary difference in different kinds of welding operations.
Average Welder Salary in California
Welders earn good salaries. Most of them earn from $44,000 to $83,000 a year. However, some are more qualified and make more than this average wage. These welding professionals usually work long hours and sometimes have to work in extreme weather conditions. As such, they must be adaptable and have some welding experience.
As the number of construction jobs is increasing, the demand for experienced welders is increasing. This creates an excellent opportunity for welding professionals. According to the California Workforce Development Agency, there are more than 100,000 welders in the state. In addition to compensation, many welders also get benefits and overtime.
The American Welding Society offers certification for welders. This certification proves that the welder has a high level of skills and has the ability to weld different materials. Welders who have this certification are more likely to get higher salaries.
How Much Does a Welder Make in a Month in California
Welding is a physically demanding job, but most welders earn a reasonable salary. Some employers offer higher pay for experienced workers. According to the Bureau of Labor Statistics, the average monthly wage for welders in California is $4,500. However, this does not include overtime or benefits.
If you want to start a welding career in California, you will most likely need to complete a technical welding program in high school and gain some basic practical skills. There are a number of welding training programs available, which can range in cost from a few thousand dollars to $50,000. These programs can be obtained through AWS or from local licensing bodies.
A welder’s salary can reach six figures if he is skilled and willing to work long hours and travel. In addition to this, welding professionals can also start their own businesses or hire other welders, which will boost their income.
Average Welder Earnings in California by Seniority
While average welders are in their mid-50s, the baby-boomer generation has a smaller number of workers than the generation that preceded them. Because of this, most economists predict that by 2020, the US will have a labor shortage. This shortage will likely be in the skilled trades.
In the United States, welders can expect an 8% raise every 17 months. However, it is important to understand that these increases vary based on performance. For instance, in San Francisco, union welders earn around $104,056 per year, which is more than 50 percent more than the national average.
California’s economy is booming, and this means that there is a high demand for welding services. As a result, the average pay for a welder in the state is up to $80 per day. However, if you have a lot of experience, your salary may be even higher.
Average Welder’s Salary by Years of Experience
A Welder’s salary in California is influenced by their years of experience. According to the California Workforce Development Agency, there are over 100,000 welders in the state. The salary includes overtime and benefits. The average salary in California is $14 USD per hour.
Although welding is a physically demanding job, most welders earn a respectable income. While wages will vary based on location, years of experience, and skills, many employers offer higher salaries to experienced welders. The Bureau of Labor Statistics estimates the average welder salary in California at $4,500 per month.
Salary figures vary from one state to another. Starting salaries are higher in some states than in others. While the starting salaries for welders may be high, the median salary is still $41,380 per year. This means that fifty percent of welders in California earned less than this amount and fifty percent made more.
Average Welder’s Salary by Education in California
In California, welders with between 0 and 20 years of experience are in high demand. However, not all welders are created equal. Every welder has a unique skill set, personality, and style of work. Because of these differences, it’s difficult to determine the average welder’s salary in California.
According to the U.S. Bureau of Labor Statistics, there will be a growing demand for welders through 2026. This means that there will be an average of 22 500 new job opportunities. The median salary of a welder in California is $44,159, while the national average is $39,523. The top 10% of welders earn more than $45,600 per year.
While welders make a decent living, the job is physically demanding and stressful. Even though most welders make a modest wage, some employers will pay higher wages for more experienced welders. In California, the average welder’s salary is $4,500 per month, not including overtime and benefits.
Hourly Welder Wages in California
In California, hourly welder wages tend to be a bit lower than in some other states. However, as more manufacturing facilities open in the state and larger metro areas begin to raise the minimum wage, more fabrication companies have been forced to raise their wages to attract entry-level workers. There are other factors to consider as well.
Hourly welder wages in California are higher in San Francisco than in any other California city. The state’s median wage for welders is $48,590 a year. This figure includes overtime and benefits. However, these averages are only estimates. Depending on your skills, location, and years of experience, you could earn significantly more.
Despite California’s high costs of living, you can still earn a good living as an entry-level welder. While you won’t be earning top dollar right away, you will be able to start earning a decent wage soon after completing a welding training program. According to The WELDER, which is a sister publication of The FABRICATOR, entry-level welders in this state earned between $17 and $21 an hour. This represents an increase of 43 percent.
Daily Average Wages for Welders in California
The average salary for welders in California ranges from $40 to $500 a day, depending on their level of experience and location. In California, there is a high demand for welders with a variety of skills, but not all of them are created equal. They can differ greatly in style of work, personality and level of skills. For this reason, the average salary for welders varies greatly across the state.
If you have excellent skills and are willing to work long hours, a welding career can pay six figures per year. However, a welder must be willing to travel to various construction sites and be flexible with their schedules. Additionally, a welder should be able to subcontract work for other welders.
In California, welders with less than two years of experience earn about $35,000. In California, welders with five to ten years of experience can make as much as $48,000 per year. In the United Kingdom, however, experience has less of an impact on salaries than in the US. A recent survey indicated that the average salary of a welder in California is around $60 per day.
How Much Do Welders Make in California Annually
As the state’s economy grows, so too does the need for skilled welders. An experienced welder salary is $50,000 or more a year, depending on the type of work they do. To find out how much you can earn as a welder, research local welding companies in your area. Consider partnering with a local service provider, which will give you a chance to work with local experts and enhance your skills.
Earning a high salary as a welder means taking the time to earn a variety of certifications. It’s common to earn at least three certifications, including Flux Core, Stick, and TIG, but earning all four is ideal. In addition, you should learn how to weld pipes, too.
While welding can be a stressful and physically demanding job, it pays a good wage. Many employers are willing to pay more for experienced welders. According to the Bureau of Labor Statistics, the average California welder earns about $4,500 per month, and that’s excluding overtime.
James is a welding expert, accomplished author, and trusted guide with over 8 years of experience in the industry. With his in-depth knowledge and engaging writing style, James has become a true authority in the field, offering readers and clients invaluable expertise and insights to take their welding skills to new heights.

by James | Oct 5, 2022 | Welding
Would you like to know how hot a plasma cutter gets? Due to the fact that it’s the most effective way to cut metal with heat, it needs to be extremely hot. The plasma cutter can chop through the material at speeds up to 200 inches per minute. The technology for increasing heat has been improved by scientists and engineers. Here are the best budget plasma cutters under $500 that are excellent options for welders.
They have gained tremendous traction since starting at less than 35 inches per minute and now at 200 inches per minute. Plasma has the potential to achieve so much more than we can imagine. Here you can also read the guide on how to cut aluminum with a plasma cutter.
What is Plasma?
The fourth state of matter after the gas is plasma. From solid to liquid and then gas to plasma, matter undergoes a series of changes. Each stage differs mainly in its temperature. Plasma is a hot, ionized gas composed of electrons and ions. When plasma is heated to high temperatures, it can be used to cut through metal.
Plasma cutting is a process that uses a high-powered stream of plasma to cut through metal. The plasma is created by ionizing a gas, such as argon, in an electric arc. The plasma is then directed at the metal, which is melted or vaporized by the heat of the plasma.
How Hot is Plasma Cutter?
To understand how hot a plasma cutter can get, we must first understand what plasma is. Plasma is essentially the fourth state of matter. It is created when gas is heated to the point where electrons are stripped from atoms, creating ions. This process is called ionization.
Plasma is often referred to as the ” fifth element ” because it is not found naturally on Earth. However, it can be created using a plasma cutter. A plasma cutter uses electricity to ionize the gas, which then creates plasma. The temperature of the plasma depends on the gas that is used and the amount of electricity that is applied.
The most common gas used in a plasma cutter is argon. Argon has a boiling point of -185 degrees Celsius (-301 degrees Fahrenheit). When argon is ionized, it can reach temperatures of up to 30,000 degrees Celsius (54,000 degrees Fahrenheit). This makes argon the hottest gas that can be used in a plasma cutter. Hope now you have got the answer to how hot is plasma cutter.
Other gases that can be used in a plasma cutter include nitrogen, hydrogen, and helium. These gases have lower boiling points than argon and will not get as hot when ionized. Also read the guide, on whether you need a welding helmet for plasma cutting.
Future of Plasma Cutting
Plasma cutting is a process that uses a high-velocity stream of ionized gas to cut through electrically conductive materials. The gas is heated to such a high temperature that it ionizes, creating plasma.
This process has a number of advantages over traditional cutting methods, such as oxy-fuel cutting. Plasma cutting is faster, more precise, and produces less waste. It can also be used to cut materials that are difficult or impossible to cut with other methods, such as stainless steel and aluminum.
Plasma cutting has been around for decades, but it has only recently begun to be used on a large scale in industrial applications. This is due to the development of more powerful and reliable plasma torches in the last few years. These torches can cut through thicker materials at higher speeds than ever before.
The future of plasma cutting looks very bright. With the continued development of more powerful and efficient plasma torches, there is no limit to the applications of this technology. It will become increasingly common in a wide variety of industries, from automotive manufacturing to shipbuilding.
Cost of Plasma Cutter
A plasma cutter is a very popular tool among welders. It is used in a variety of industries, including automotive, aerospace, and shipbuilding. A plasma cutter can cut through thick and thin materials quickly and easily. It can be used to cut stainless steel, aluminum, and even titanium.
The cost of a plasma cutter can vary depending on the brand, model, and size. For example, a small handheld plasma cutter can cost around $200 while a large industrial plasma cutter can cost upwards of $10,000.
Working of Plasma Cutter
The plasma cutter working is very simple. An electric arc is created between an electrode and the workpiece. This arc is used to ionize a gas, which is then forced through a small nozzle at high speed. This results in a jet of plasma, which is hot enough to cut through metal.
Do You Need Gas for Plasma Cutter?
Plasma cutting is a process that uses a high-energy plasma arc to cut through conductive materials. Plasma cutting is often used in industrial applications such as cutting steel plates, pipes, and other structural materials. In order to create the plasma arc, gas is required. The most common gases used for plasma cutting are argon and hydrogen.
What Metals will a Plasma Cutter Cut?
A plasma cutter is a tool that uses a stream of hot plasma to cut through conductive materials like metal. Plasma cutters can be used to cut through both thin and thick metals, and they are often used in industrial settings to quickly and efficiently cut through large pieces of metal. Plasma cutters can also be used for more delicate tasks, like cutting intricate shapes or patterns into metal.
Can A Plasma Cutter Cut Rock?
Plasma cutting is an incredibly versatile tool, with the ability to cut through a variety of materials. This includes both metal and non-metal materials, making it a popular choice for those in the construction and manufacturing industries. But can a plasma cutter cut through rock?
The answer is yes, but there are some limitations to consider. The easiest rocks to cut through with a plasma cutter are sedimentary rocks, such as limestone or sandstone. These rocks are relatively soft and have a lower silica content, making them easier to cut. However, harder rocks, such as granite or basalt, can also be cut with a plasma cutter if the right settings are used.
Final Words
To ensure a successful cut, it is important to use the correct settings on your plasma cutter. This includes using the correct cutting speed and choosing the right tip for the material you are cutting. It is also important to have a steady hand when using a plasma cutter on rock, as any mistakes can result in an incomplete cut or damage to the material.
James is a welding expert, accomplished author, and trusted guide with over 8 years of experience in the industry. With his in-depth knowledge and engaging writing style, James has become a true authority in the field, offering readers and clients invaluable expertise and insights to take their welding skills to new heights.
by James | Aug 21, 2022 | Welding
Cutting metal isn’t easy, and it gets even more challenging when you need to cut through something as tough as aluminum. Thankfully, there are ways to make this much easier without sacrificing quality or strength. Instead of using standard tools like shears or a saw with blades that have a tendency to snap on thin metal sheets, you must use best-budget plasma cutters to even get through thick materials with ease. Here we discuss in detail how to cut aluminum with a plasma cutter. What factors you must consider while plasma cutting?
Plasma cutters are one of the most versatile tools that a mechanic or manufacturer can have in their toolkit. Capable of cutting through almost any metal with ease, plasma cutters can be used for a wide variety of tasks. However, even though they are so versatile, there are still some materials that will give your plasma cutter trouble.
Plastic and aluminum are two common materials that may cause you problems when cutting with a plasma cutter. While plastic is fairly easy to cut with a hand-held device, aluminum needs special techniques to get the job done safely and efficiently. Below you will find everything you need to know about reducing the risk when working with this tricky material.
What is Plasma Cutting?
Plasma cutting is a process that uses a high-voltage arc to ionize a stream of gas, which then melts and vaporizes the metal being cut. Plasma cutting is a very versatile process that can be used to cut metals of all shapes and sizes. It is commonly used in welding and fabricating applications.
Plasma cutters ionize the atoms in compressed air by heating them to a very high temperature using DC voltage, which results in the formation of a “plasma arc.” This moves through the cutting tip’s small hole, which is typically 0.9 mm to 1.5 mm wide, at a temperature of between 25,000 and 30,000 degrees Fahrenheit.
The tiny plasma jet pushes through, melting the metal, and ejecting the molten metal. When compared to outcomes from oxy-fuel cutting, it is extremely targeted.
What You Need to Know About Cutting Aluminum with a Plasma Cutter
If you’ve ever tried to cut aluminum with a plasma cutter, you know it can be a frustrating experience. The aluminum seems to melt before the cutter can even make a dent. But with the right settings, you can actually cut through aluminum with a plasma cutter – you just need to know how to adjust the settings.
We’ll give you a quick overview of how to cut aluminum with a plasma cutter. We’ll cover the different settings you need to adjust, as well as some tips and tricks to help you get the best results. With this information, you should be able to cut through aluminum like a pro.
There are a few things you need to know before you start cutting aluminum. First, you need to make sure that you are using the correct settings on your plasma cutter. Second, you need to be aware of the fact that aluminum can reflect the cutting torch, so you need to take precautions to avoid injury. Finally, you need to be aware of the fact that aluminum can create a lot of heat when it is being cut, so you need to be careful not to overheat the metal.
Plasma Cutter Safety
When using a plasma cutter, there are a few safety precautions you should take to ensure you don’t injure yourself or damage the equipment. First, always wear an excellent welding helmet or safety glasses to protect your eyes from the bright light given off by the plasma cutter. Second, be sure to wear welding gloves to protect your hands from the heat. Third, make sure the area you’re working in is well-ventilated, as the plasma cutter emits fumes that can be harmful if inhaled. And finally, always read the instructions carefully before using the plasma cutter, to ensure you understand how to properly operate the equipment.
Equipment Recommendations
There are a few key things you’ll need in order to do plasma cutting, including a plasma cutter, a power source, and a metal table. You’ll also need some sort of personal protective equipment. Most welders use the best welding mask and welding jeans for their protection.
As for the plasma cutter, we recommend getting a cutter that is at least 40 amps. Anything less than that will likely be too weak to cut through thicker materials. For the power source, you can use either an AC or DC power source. AC is usually cheaper, but DC has a steadier power output, which can be helpful when cutting through tougher materials.
As for the metal table, you can either buy one or build one yourself. If you’re going to be doing a lot of plasma cutting, we recommend buying a table for plasma cutting. But if you’re just starting out or rarely do such work. It’s not mandatory for you.
Choosing an Aluminum Cutting Process
There are a variety of aluminum cutting processes available, and each has its own advantages and disadvantages. The best way to choose an aluminum cutting process is to first understand the different options and then decide which one is best suited for your specific project. Here is a quick overview of the most common aluminum-cutting processes:
Waterjet cutting: Waterjet cutting is a popular choice for aluminum cutting because it is very precise and can be used to cut very intricate shapes. The downside of waterjet cutting is that it is slower than other methods and can be costly.
Laser cutting: Laser cutting is a fast and precise aluminum cutting method that can be used for a variety of projects. However, laser cutting can be expensive and is not always the best choice for thicker aluminum pieces.
Using a Hookless Cord and Hanger
Most plasma-cutting machines come with a hook on the end of the power cord so that you can hang the machine from a hook on the wall or elsewhere. However, some people find that using a hookless cord and hanger is a better option.
There are a few advantages to using a hookless cord and hanger. First, it can be easier to set up and take down. Second, it can be more comfortable to use, since you don’t have to worry about the hook digging into your back or shoulders. Finally, it can be more versatile, since you can use it in a variety of different positions.
If you’re considering using a hookless cord and hanger for your plasma-cutting machine, there are a few things you should keep in mind. First, make sure that the hanger is rated for the machine’s amp.
Using an Oxygen Process
Plasma cutting is a process that uses a stream of hot plasma to cut through materials. This process is typically used to cut through metals, but it can also be used to cut through other materials like wood and acrylic. Here is the complete guide on the hotness of the plasma cutter.
One of the benefits of using an oxygen plasma process in plasma cutting is that it can help to improve the quality of the cut. Oxygen plasma cutting produces a cleaner, more precise cut than other methods of plasma cutting. Additionally, the use of oxygen in the plasma-cutting process can help to extend the life of the cutting equipment.
Grind the Edges
Plasma cutting is a great way to quickly and easily cut metal. But if you want a clean, professional-looking edge, you’ll need to take a few extra steps. Here’s a quick guide on how to grind the edges of your plasma-cut metal for a smooth, finished look.
First, start by setting up your work area. You’ll need a grinder, a dust mask, safety glasses, and a few other tools. Next, prep your metal by cleaning it and removing any burrs or sharp edges. Once your metal is ready, start grinding the edges in a slow, steady motion. Be careful not to overheat the metal, and make sure to wear your safety gear while you work. With a little time and effort, you can create beautiful, smooth edges on your plasma-cut metal. So get started
Plasma Cutting Complete Setup
Now you know all about plasma cutting, it’s time to learn how to set up and operate your machine safely. You’ll need to choose a location and set up your machine according to your needs. Set up your metal table in a well-ventilated space (like a garage or storage space), and make sure it won’t get cluttered with lint or debris. After that, you’re ready to get to work.
To set up your plasma cutter, simply attach the resistors and power cord to the machine, then screw in the cylinder headpiece. Next, attach the protective nozzle cover plate to the cylinder head, and make sure to tighten it securely. Now you’re ready to start plasma cutting.
To begin plasma cutting, make sure that the air intake is fully open, and then plug your plasma cutter into the power source. If your plasma cutter only comes with an AC power source, plug in your machine to an outlet that is controlled by a single switch (so it doesn’t get turned off accidentally). If your plasma cutter comes with a DC power source, you can use a simple battery charger to power your machine.
Once you’ve set up your plasma cutter, it’s time to fire up the machine. Press the button on the side of the machine to turn it on, wait for it to warm up, and then reach in and turn off the air intake.
Read More: How to Cut Aluminum with a Plasma Cutter
James is a welding expert, accomplished author, and trusted guide with over 8 years of experience in the industry. With his in-depth knowledge and engaging writing style, James has become a true authority in the field, offering readers and clients invaluable expertise and insights to take their welding skills to new heights.

by James | Jul 14, 2022 | Welding
Normally, we are all familiar with heat welding and see that almost all welders use heat to join two metal components. Heat is considered the main component in welding. Then, what is cold welding? How can we join two metal components without melting or heating them? I know there are a lot of questions in your mind. In this article, we are going to discuss all about cold welding that you need to know. Let’s scroll down and read this article to get a clear understanding of cold welding. In this article, we have also covered the benefits and applications of cold welding
What is the Phenomenon of Cold Welding?
To understand cold welding, it is vital to know that there is an oxide layer on every metal component. That oxide layer prevents metallic atoms from connecting and making a bond with each other. If this layer is removed then the components make a bond and then attached to each other.
Cold welding is considered solid-state welding in which we fix two metallic components with almost no or minimum heat. In this welding, we do not heat or liquefy any material. In cold welding, we only use energy in the form of pressure to join two metals.
If you take some flat metal pieces and rubbed them, nothing happened because of the oxide layer. But when you properly clean all the parts and combine it under vacuum, they’ll surely get stuck with each other as the oxide layer will be removed. This is how cold welding happens.
Is Cold Welding Reliable?
Cold welding is as reliable as casual heat welding. If you follow all the steps, requirements and procedures then cold welding would be best for you. Make sure that cold welding is only good for plan and oxide metal. So, do not use cold welding for carbonate content and non-ductile brittle metal materials.
In this current era, cold welding is mostly used to make butt and lap joints, Nano-scale and TIG cold welding. Butt joints are preferable to welding aluminum. In butt joint cold welding, you don’t have to clean the surface. You can easily break up the additional layer by pressure or any cold welding machine. In this way, it is less complicated and turns out to be a time savior.
Moreover, lap joint cold welding needs proper cleanness because the metal cannot get stuck without cleaning. It takes extra care and effort. After that, you can easily break the oxide layer and do cold welding with your lap joint method.
Benefits of Cold Welding
There are many benefits of cold welding. But here we only discuss some advantages of cold welding.
- It is good for aluminum, silver, nickel and copper wire as other ways might be difficult.
- The bonds made by cold welding do not need intermetallic compounds and are highly strong and last longer.
- It doesn’t have any heat-related work that reduces mechanical change and negative results.
- It has the ability to join and fix dissimilar materials.
- Cold welding is not expensive to start up and works fast.
- This cold welding is really conventional and welded in a solid state.
How to Learn Cold Welding?
It is obviously hard for a newbie to learn cold welding. But for an experienced welder, it’s not difficult to learn and do cold welding because he knows the basics of welding. A cold welder needs to learn the right way to clean metal components and the best way to break them down. The cleaning part is quite hard because you need to remember many important things.
For heat welders, cold welding will be quite easier as they don’t have to learn and follow multiple kinds of things including arc, and lasers. Also, you don’t have to deal with heat, welding uniform, helmets etc. the only thing you wear for safety is a pressure safety helmet. Cold welding is the simplest but most expensive type of welding. It is simplest because no arrangement is required to make a start-up. But the machines and materials of cold welding are expensive and it’s difficult to manage a working environment with high production.
Cold welding is a time-consuming learning process. In cold welding, once you have done with welding but unfortunately the metal pieces do not stick then it is very hard to reform or refix it. Therefore, it’s vital for a cold welder to practice it before starting a career as a cold welder. Also, keep in mind that cold welding is highly suitable for non-ferrous metal materials.
Applications of Cold Welding
Cold welding is frequently used in the manufacturing of aluminum, copper, silver, and platinum wires with 0.5 to 12mm.
- It is also used for butt joints and works as a time savior.
- The pressure technique used in cold welding is beneficial for sealing containers that cannot be done by heating.
- It is somehow beneficial in the electronic industry to make heat-sensitive devices.
- Cold welding is environmentally friendly and suitable for underground wiring.
- Aircraft, automotive, space crafts, scientists and advanced fabrication use cold welding for various purposes.
Cold Welder Need any Safety Equipment?
Safety should be your priority in all kinds of work. But when it comes to welding, the importance of safety increases more. Because welding is a complex job that demands focus and protection. Whether you are a cold welder make sure to save yourself in every possible way. A cold welder doesn’t have to wear thick and high-quality welding gloves and other safety gear. You just have to wear a pressure-controlling helmet or protective glasses along with gloves. That will be enough for the safety of cold welders.
What is Cold Welding (Conclusion)
That’s all about the topic what is cold welding. I hope now you are well aware of cold welding, its benefits and applications. We discussed different aspects of cold welding, its benefits, uses and safety requirements. We have also discussed how cold welding works and for what materials it is suitable. If you are thinking of becoming a cold welder then this article will surely help you to increase your knowledge and help you to understand all about cold welding.
The only limitation we found about cold welding is that it required a flat and smooth surface. It doesn’t work well on irregular and ferrous metals. These are the few limitations why cold welding is not used in some industries. Moreover, cold welding is suitable for both genders. If you are a girl and want to be a cold welder then go on and start learning as there is no restriction. Many females have already introduced themselves as professional welders and are working in the industry.
I hope now you have a clear understanding of what is cold welding and the career of cold welders. You are ready to get into the cold welding industry. Don’t wait more, go and start learning cold welding and make your own rank in the industry.
James is a welding expert, accomplished author, and trusted guide with over 8 years of experience in the industry. With his in-depth knowledge and engaging writing style, James has become a true authority in the field, offering readers and clients invaluable expertise and insights to take their welding skills to new heights.
by James | Jul 9, 2022 | Welding
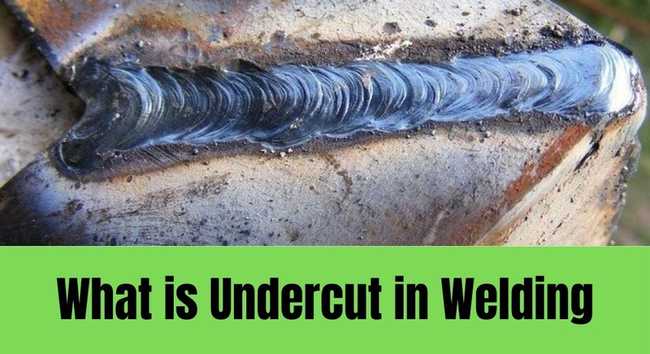
The welding operations are not as simple as it seems. If you tried welding for the first time, it most likely resulted in deformation. This may be due to a weak spot in the weld, which results in the weld being less durable than expected. As of now, we can tell you that the deformity is caused by undercutting in welding. Here we also explain what is undercut welding. The term undercut in welding refers to a groove that develops at the base or root of the metal.
The definition of a groove can be simplified to describe a long and narrow cut made in hard material. Welders of all levels are sometimes faced with this widespread problem. The practice of undercutting can cause several problems with your weld, resulting in a loss of productivity and money. In this article, we will provide a little more insight into what causes undercutting and how to avoid it. Also, check our other article that differentiates between good welding and bad welding.
What is Undercut Welding?
Undercutting occurs when under-filling or insufficient fusion of weld metal causes a depression on the face of the metal. Depending on the degree of depression, it may be visible or invisible to the naked eye. This occurs when the flux does not melt completely before the puddle while welding a fillet.
It mostly occurs in stainless steel because it takes more heat to melt this type of steel than regular steel, preventing proper fusion between both sides, resulting in an undercut. The result is what we regard as an undercut in welding. Also read this guide on what is overlap in welding.
Undercut Welding Types
Now you are well aware of what is undercut welding. So, let’s look at the types of undercut welding. Undercuts can be classified into different types. Internal and external undercuts are the most common types.
Internal Undercut
Weld metal that is not deep enough inside the joint to cover the joint’s backside is an internal undercut. As a result, the backside of the weld is concave, and the cause of this can be attributed to several factors, including unsuitable wire diameters for the welding application, a poor fit-up of the joints, or incorrect welding techniques.
Welds performed with poor technique will usually appear to be not penetrating. Moreover, it can be difficult to tell if you have an internal undercut simply by looking at your weld bead, so don’t hesitate to remove it for inspection.
External Undercut
There is a difference between an internal undercut and an external undercut. An excess weld metal can cause a convex surface due to excess weld metal being deposited on the face side of the weld joint.
You may experience this problem if you use too large a wire diameter or allow too much heat to accumulate in your puddle and cause “blow-through.” It is common for filler metal with a larger diameter than the base material (sheet metal thickness) to blow through and cause an external undercut if you do not pay close attention.
Main Causes of Undercutting in Welding
If you constantly encounter an undercut during welding, there is something wrong with your technique. It is now clear to you what is undercut welding all about, so let us now look at what causes it. It is also possible that the metal is overheating. There are several common reasons for undercutting, including:
Excessive Arc Maintenance
It is important to note that the appropriate arc length will depend on the electrodes. The metal portion of the core provides a starting point for the design. Ensure that the diameter of the metal portion of the core does not exceed the diameter of the arc. Using an electrode of 1/8-inch 6010, for example, you should hold it about 1/8 inch off the base material.
Selecting a Gas Field Incorrectly
In particular, when using MIG (active metal gas) welding processes, it is important to select the appropriate gas. The most common cause of undercuts is a wrong choice, so be careful not to make the wrong choice. The first step in preventing this is to assess the type and thickness of the material. Based on this information, you can determine the appropriate gas composition.
Rapid Travel Speed
If you travel too quickly with your arc, the metal will melt faster than the rod can be melted into it. Consequently, the weld bead becomes undercut due to poor fusion lines. You should slow down your travel speed and maintain a more consistent arc length to resolve this problem.
High-Voltage Use
As a result of the arc heating the weld puddle more quickly than it can be filled, high voltage welds produce an undercut. The result is the creation of an undercut between the weld puddle and the wire electrode. You should use lower amperage settings when welding at higher voltages.
Gases Contaminated with Shielding
Contaminated shielding gas is one of the most common causes of an undercut in welding. If you use a dirty or contaminated shielding gas, the flow of your weld puddle is inhibited, resulting in an arc burning through the top, which results in a gap between your two pieces that need to be welded together.
Inconsistent Flow of Shielding Gas
A lack of shielding gas is another cause of an undercut during welding. You may encounter this problem if you do not use a gas lens to smooth the flow of gas, which directs the shielding gas over your weld puddle and prevents it from being blown away by the air currents or excessive turbulence around the arc. Another possible reason is that your regulator is set too high, and you are wasting gas by not having a smooth flow out of the timeline.
Use of Wrong Filler Metal
It is common for an undercut to occur when the welding arc melts the base metal too rapidly, creating a space between the melted plate and the filler material. Often, this occurs when a filler metal is too large for the joint to be welded, an overheated arc is used, or excessive speed is maintained during the welding process.
Overspeeding Welding Process
If you weld too fast, it can cause an undercut in welding. In the case of filling large gaps between metal pieces, the arc will melt on both sides, which will cool down into two separate pools before the rod melts into them. This results in an insufficient weld that is weak and does not penetrate the material.
How to Prevent Undercut in Welding
You are well aware of what is undercut in welding, now take a look at preventions. Similar to any welding defect, the first and most important step in preventing undercuts is determining what causes them. Identifying the cause of any welding defect is sufficient to eliminate it. Also read this detail guide on how to prevent undercut in welding.
Moreover, you should also be familiar with preventive methods to reduce undercuts in your welds and know the basics. As it is now clear to you what is undercut welding and what are its causes. Let’s take a look at what can prevent undercut welding from occurring in the first place. The most effective preventive measures are listed below.
Welding in Passes
If you want to overcome undercutting in welding, you must do welding in passes. There are many advantages of using this technique. The primary benefit is that it will reduce the chances of undercut in welding. The fusion properties of the metal are stabilized through this process, resulting in a reduced rate of undercutting.
Specify the Length of the Arc
It is possible to cause scattering and undercutting when welding at distances greater than the diameter of the rod from the molten metal. The electrode should not be more than an eighth inch away from the base when welding an item eight inches in diameter.
Using the Proper Weaving Technique
In addition to mastering the weaving technique, another way to prevent undercutting is to ensure your thread is tightly woven. Regular pauses between each side of the weld will minimize the amount of molten metal that splashes back into the welding area. When the electrode weaves at a high rate of speed, undercuts can also occur due to the high speed.
Use Shielding Gases in an Effective Manner
Imagine a situation in which molten metal comes into contact with air. When this occurs, it is essential to protect the metal from oxygen and other atmospheric gases so that the subsequent reaction does not result in the undercutting of the metal. A combination of gases should be used in the shield, according to the type and thickness of the metal being shielded.
Choosing the correct shielding gas is a tricky task for inexperienced welders. If you are one of those people who fall into that category, you can watch the video to learn more about choosing the right gas for your needs. It is vital for you to know because it helps you to understand what is undercut welding.
Ensure Correct Position and Angle
Numerous risks are associated with welding, but the angle at which you are welding is extremely important. So, you can never undermine the importance of position and angle while welding. If the angle or position is not right while welding, it can cause undercutting in welding.
Improve the Efficiency of Travel
Occasionally, welding processes can fail as a result of low travel speeds. Low travel speeds cause undercuts, burn-throughs, incomplete penetrations, inter spattering, cracking, and other defects. The travel speed of the weld metal must be adequate to fill the joint area.
Preparation of Metal Surfaces
Metal surfaces that will be welded must be cleaned before welding to prevent flaws such as undercuts. Due to deposits such as rust, paint, moisture, and oil, certain surfaces interfere with the welding process. As soon as you reach the debris, stop, so that trapped bubbles are allowed to escape before the metal solidifies.
Stable Work Environment
Welders should use sturdy clamps when fastening structures for welding, minimizing the number of undercuts made during the welding process. To ensure that the motion path during welding is correct, you must have a solid working bench.
What are Undercut Welding Measurements?
It is vital to know the measurement of undercut welding because it helps you to get a clear idea of what are undercuts in welding. According to the rule, Undercuts shall not exceed 1/32 inches. Any 12-inch weld with an accumulated length of up to 2 inches is exempt from that rule, which requires an undercut of 1/16 of an inch. To sum up, remember that you cannot exceed 1/32 of an inch in depth with the undercut. Under industry standards and regulations, anything below that is considered acceptable.
As such, it should be your goal to avoid undercuts whenever possible. It is possible to learn the proper techniques and hone your skills. In most cases, undercut welds result from welders who don’t know how to adjust their technique to improve their welds. A beginner may need time and practice to improve, and that’s fine.
Undercuts should be measured with a bridge cam gauge. Undercut gauges can be inserted into gouges to tell how deep the undercut is and whether it is permissible.
How to Repair Undercuts in Welding
The decision of whether to repair an undercut can be a difficult one in the welding industry. Before deciding, it is essential to weigh the costs against the benefits. It is possible to repair an undercut, regardless of choice, and it can be an easy process depending on the severity of the undercut.
Weaving and stringer beads are two of the most commonly used techniques for filling the undercut groove. Additionally, it is possible to grind down the weld, but this could reduce the overall strength of the joint. A mechanically nicked or gouged surface adjacent to the weld metal is not permitted. Grinding, chipping, and gouging are also methods of removing metal.
As-rolled steel may be used. Removing any unwanted portions of the weld is essential to prevent the base metal from being substantially removed from the weld. Welding can only be performed on surfaces that have been thoroughly cleaned. Whenever there is a deficiency in size, weld metal must be deposited to compensate. A certain amount of undercut is acceptable in a weld, regardless of why the undercut cannot be repaired.
How Much Undercut is Acceptable?
For a professional welder, it is vital to know what is the acceptable limit of the undercut. A section should not have more than 0.5 mm of undercut if it complies with the recommended thickness for a section, and the undercut should not interfere with the minimum thickness required for the section.
It is unacceptable to have undercuttings deeper than 1/32 inch in depth. It is imperative for welders to know this range because it helps them to get a clear idea of whether it is undercut or not. A welder should also be familiar with what is arc blow in welding.
Conclusion:
Your ultimate goal should be to produce a sturdy, high-quality weld with little to no undercut. If a weld is undercut, the integrity of the weld will be reduced, and it will also look less professional. To correct it, additional work must be performed. You are mistaken, if you believe that rushing through a project and undercutting are normal in welding. You are not increasing your productivity by doing undercut in welding operations.
Take your time, pay attention to what you are doing, and practice your skills as much as possible. You will need to put forth a significant amount of effort to improve your welding skills. Although it is true that any welder can’t guarantee that he will never face an undercut in welding. But if you follow the above guidelines, there will be minimum chances of undercutting. Hope this article will help you to understand undercutting in welding.
James is a welding expert, accomplished author, and trusted guide with over 8 years of experience in the industry. With his in-depth knowledge and engaging writing style, James has become a true authority in the field, offering readers and clients invaluable expertise and insights to take their welding skills to new heights.
by James | Jun 28, 2022 | Welding
Cast iron is hard, brittle, expensive, cheap material and a thorn in the flesh; however, it is used in every area from workshops to kitchens. It’s a disaster to discover a crack in cast iron parts. It could result in a significant financial loss when replacing the damaged part or hiring experienced casting iron welding experts to join the crack. Consider it an opportunity to study the art of welding cast iron which will be a new technique for many beginner welders.
The challenge of knowing the best way to weld cast iron isn’t easy since a mistake can ruin your broken piece more. Be sure to follow the instructions strictly to ensure that the casting iron welding you are doing has no cracks and the strength that is internal enough to stand up to the demands of the part. The goal you have set is knowing how to weld cast iron components can help you save money and time. Also, know about the welding career, whether is welding a great career and what kind of welding has a great career ahead.
Cast Iron Welding Processes
Welding can be used to salvage castings made of iron for repair, fix castings that have failed during service, and join castings or steel parts used in manufacturing processes. The choice of welding procedure and welding filler metals is based on the kind of desired weld properties as well as the planned service timeframe. For instance, in the case of our shielded metal-arc welding method, there are various kinds of filler metals that may be employed. Also, read what is arc welding.
Filler metals will impact the color matching of the weld compared to the base metal. The color match could be an important factor in the repair or salvage of castings where the color difference will not be acceptable. Certain preparation steps should be followed in whichever welding technique is chosen. The techniques are vital to follow if you want to get a great result with cast iron welding.
Cast Iron Welding Preparation
When preparing the casting for welding, it is important to remove any surface material to cleanse the casting within the area where the weld will be. This involves removing grease, paint oil, and unwanted materials from the weld area. Moreover, the best way to weld cast iron must be valued in order to carry out the preparations.
It is recommended to heat the weld area for a brief period to eliminate gas trapped within the weld zone of base metal. The high silicon or skin layer should be removed in addition to the weld region on both faces and the root side. The edges of the joint need to be chipped away or ground into 60deg angles or slopes.
When grooves are needed in the design, a V groove with a 60-90deg included angle is recommended. The V should be approximately 1/8 inch. (3.2 millimetres) from the base part of the crack. A small hole must be made at the end of the crack to prevent it from expanding.
Complete penetration welding should be the only method to be used since cracks or defects that are not fully removed could reappear under the conditions of service. Also, read what is Arc Blow in welding.
Why Welding Cast Iron Can be Problematic
The question which arises after how to weld cast iron is how difficult it is to perform. Moreover, it is important to comprehend the difficulties of completing the task before finding ways to join cast iron. This is because the chance rate of correctly welding cast iron is only 50%. There is an increased chance that the cast-iron item you’ve welded may crack or be damaged after you’ve finished welding it.
What is the reason for this issue? Because a variety of different materials in various proportions form cast iron. Assessing the durability of the metal you’re working on can be challenging. It is also difficult to figure out the amount of heat a cast iron can withstand before it begins to break. The high carbon content in this iron piece is the reason for all of these issues.
When you weld, the carbon may transfer to the metal that you welding or the area adjacent to the metal being welded that is being heated. This can lead to more brittleness and hardness, which can cause post-weld cracks. A welder should also be familiar with what is flashback in welding.
The Different Techniques/Methods for Welding Cast Iron
There are many methods of welding but here we specifically discuss how to weld cast iron. We’ll only be able to talk about the most commonly used methods to weld cast iron. The methods are gas welding, arc/stick welding, MIG, and TIG welding. Here is a brief description of each. These are the best methods of welding cast iron.
Gas Welding
Compared to the Arc-based techniques that use cast iron for welding, the heating process is much slower when using gas welding. Furthermore, the flame is lower in temperature than an arc utilized for this method.
The benefit of this is that carbon migration is usually not a concern when casting iron is welded with the gas welding technique. It is, however, essential to use a specialized gas welding rod for the procedure.
The main issue with this method is that it needs an enormous amount of heat when large parts are being used to weld. Gas welding is also slower than other methods of casting iron welding.
Arc/Stick Welding
A shielded metal-arc welding method is suitable for the welding of cast iron. There are four different types of filler metals that can be employed. There are many reasons for using every one of the distinct electrodes. These are the machinability of the electrode, the color matching of the deposit, the durability of the deposit, and the flexibility of the final weld.
When arc welding using casting iron electrodes (ECI), prepare between 250 to 800degF (121 to 425degC) according to the casting’s dimension and nature and the requirement to machine the area around the deposit. The greater the degree of heating, the greater the ease of working world deposits. In general, it’s ideal to use small-sized electrodes with a 1-oh current set. An arc of medium length is recommended, and, if feasible, welding must be performed in a flat position.
How to Weld Cast Iron With a MIG Welder
While cast iron is welded using the MIG process and specially designed flux-cored electrode wires welding joint, the results will not be as robust as one made with MMA Arc welding. In the past, MMA sticks were suggested as the best way to weld cast iron. Here we discuss how to weld cast iron by TIG welding.
TIG Welding Cast Iron
It is true that TIG welding can provide a clean weld on cast iron. However, it is not generally preferred due to the highly localized heating characteristics that result from this process. In general, the quality of the finished weld will largely be determined by the skill with which the welder performs the process of TIG welding. Therefore, you must choose a professional welder for the welding of cast iron with a TIG welder.
Choosing the Proper Electrode & Wire Consumables
The selection of electrodes and filler wires on how to weld cast iron is incredibly limited. The products available are not designed to be used with casting iron alone. They are prone to cool quickly, cause stress cracks, and are not joined properly. Below are a few choices available in the market.
Rich in nickel content: This is the most popular electrode on the market since it is machinable and soft. The appearance is like cast iron, but it doesn’t cool rapidly also. The drawback of this electrode is that it’s expensive and unsuitable for welding large sections.
Mix Nickel 55%, Iron 45%: Iron is the same appearance as cast iron once welded, but it is quite cost-effective. The weld it makes can be machined, but it is harder than nickel’s weld. The shrinkage is less than most iron rods used for the electrode to ensure the least chance of cracking.
Iron: The welding of this rod creates a distinctive hue not found in cast iron. The property of shrinking is apparent, and it is a difficult material to the welding of cast iron. It becomes hard during welding. However, it isn’t machinable. It’s an economical choice and can easily be ground.
Cast iron: Stainless steel, when joined with stainless steel, doesn’t change the properties, or it will not harden like iron consumables. It doesn’t expand or shrink significantly during the cooling and heating of the melting process and presents an issue when it comes to using it. It produces a machine-able process following welding.
Bronze brazing: There is an option to braze using oxy-acetylene or a Tig welder. It is possible to create a sturdy patch to fill in cracks or between two parts that want to join. Brazing can join the two surfaces without altering the fundamental characteristics that cast iron has.
The Key Steps in Welding Cast Iron
The answer to the question of how to weld cast iron involves some steps. If you are welding cast iron yourself, You must be aware of the crucial steps to efficiently welding cast iron. Four steps are in DIY casting iron welding. If you follow each step in the order listed below, you’ll be able to create an extremely long-lasting cast iron welding.
1. Identify the Alloy
Cast irons belong to the iron-carbon alloy family, and an abundance of carbon characterizes them, where they obtain their characteristic of hardness. Although cast iron is extremely hard, it comes at the cost of flexibility. When compared to wrought iron, or steel, it is more brittle.
2. Clean the Casting
All castings must be prepared properly before beginning to weld, regardless of the casting alloy you’ve selected for welding. The other important thing to remember when welding is to clean the surface of all materials to make the casting ready to be welded. This ensures that the casting within the weld zone is free of dirt.
After that, the next step will be removing grease, oil paint, and obstructions to the weld’s area. One of the most crucial aspects to be aware of is that the heat will be transferred slowly and with care to the weld area for a limited time.
This can help remove any gas that is trapped within the weld zone of the base metal. One technique you could utilize to check the preparation of the cast-iron surface is placing a weld passage over the iron. If there are impurities on the metal, it is porous. To ensure that the porosity has been eliminated, run the procedure several times before grinding away the process.
3. Preheat
If they are stressed, the cast irons will be vulnerable to slipping. The primary factor in avoiding cracked cast irons is to control the welding heat. The three stages when the process of welding cast iron.
The three steps include the re-heating process, the low-heat input, and slow cooling.
The main reason for thermal expansion is managing heat when welding. Metal tends to expand once it’s warmed.
But, heating and expanding a complete cast iron item at the same time can help reduce stress on the metal. However, heating the localized area in the zone affected by heat can create stress within the iron.
The issue with localized heat is that it may cause limited expansion. In this case, the metal cooler around the zone of heat is responsible for controlling the HZ. Furthermore, the thermal variation between the body of the cast and the zone that is affected by heat determines the amount of stress.
4. Choose a Welding Technique
We’ve covered the four principal methods used to weld cast iron. According to the data we’ve provided above, you must choose a method of welding that is most suitable for your work. You must select the best way to weld cast iron according to the dimensions of the metal and the alloy to be welded.
5. Finishing
Once you’ve chosen and employed the appropriate welding method for the casting iron you are planning to weld, the next step will be completing the weld. As the weld gets cooler and expands, tensile stress can be incorporated into the casting iron that is being welded.
So, the thermal contracting stage is when the cast metal is more likely to experience cracks. Welds will certainly start cracking when the stress has reached the point of no return. However, there is a method to decrease the risk of the weld forming cracks. It involves applying compressive stress during cooling to counter tension stress.
Read More: What is Overlap in Welding?
How to Fix Cast Iron Without Welding
Before looking at how to weld cast iron, another question of absolute importance is talking about no welding for fixing it. Fixing a loose cast-iron piece is feasible. If you’re not planning to join the cast iron piece, you can handle it in a manner to prevent it from becoming loose once more. The best method of fixing loose cast iron pieces is to apply the epoxy primer.
Epoxies are commonly used in concrete to make it stronger and last longer. They also serve as a popular method of fixing pieces of cast iron that have fallen off.
Epoxies are available in a variety of colors at the majority of hardware stores. You can apply the epoxy primer on your cast iron item as you would for any other concrete project. Instead of using an epoxy primer, you can apply hot glue to repair the cast iron piece.
This will stop it from falling loose and slipping away. But, it isn’t the ideal solution as hot glue is not particularly durable and may eventually come loose and break.
Frequently Asked Questions (FAQs)
Are steel and cast iron more durable?
The debate is over which is more durable, whether cast iron or steel. It is believed that cast iron has greater compressive strength, whereas steel has more tensile strength. Steel is both hard and soft to cast. It can be difficult to determine which one is more durable.
Can a magnet adhere to iron?
Magnets can attach only to the alloy or metal, with powerful metals such as cobalt and iron as their basic constituents. In their original states, metals like brass, silver, copper, or gold don’t attract magnets.
How do you braze weld cast iron?
It requires someone with expertise to braze a cast iron. It is possible to practice using a grinding wheel 1/16 to 1/8th of an inch into the alloy. The brazing tip is bright red at 600 degrees and continues to warm and fill the gap without altering that base material.
What is the most effective cement for cast iron?
Liquid weld is a term used to describe resin and steel epoxy available. They require mixing before use. However, epoxy hardens more quicker than resin. The epoxy can be set within 5-30 minutes, while resin can take more than 8 to 10 hours to cure.
Read More: What is cold welding?
Conclusion:
Of course, you can weld cast iron. There are a handful of points to take into consideration. Preheating is generally recommended in particular for preheating methods. Using this method, the metal must be heated before welding. This goal is to stop the iron casting from being welded from stretching. While welding cast iron never undermines safety so always wear the best welding pants while any kind of welding operation.
Additionally, it is essential not to be unable to remember what to do if cracks are present on the casting iron that needs welding. In this case, the direction of welding must always be from the outside toward the inside. Attention should be given to handling the temperature and heat produced when welding. This should be taken into consideration when casting is welded. If you follow these guidelines, you’ll be competent in welding cast iron.
James is a welding expert, accomplished author, and trusted guide with over 8 years of experience in the industry. With his in-depth knowledge and engaging writing style, James has become a true authority in the field, offering readers and clients invaluable expertise and insights to take their welding skills to new heights.