by James | Aug 24, 2023 | Buying Guide
Welding, an intricate fusion of science and art, involves the joining of metals through intense heat. But behind the mesmerizing sparks and molten metal lies a lesser-known yet critical component: welding slag. In this detailed article, we delve into the depths of welding slag, unraveling its composition, formation, purposes, and techniques for removal. Whether you’re a seasoned welder or a curious enthusiast, let’s shine a light on the enigmatic world of welding slag. Also, read this guide about what tack welding is.
The Essentials of Welding Slag
Understanding the Phenomenon
Welding slag is a byproduct of the welding process that plays a significant role in achieving strong and clean welds. It’s a vitreous material that forms on the surface of the weld bead, shielding it from external contaminants and atmospheric gases during the cooling process. This protective layer is a result of the chemical reactions between the molten metal, the electrode, and the flux coating.
Composition and Formation
Welding slag is composed of various elements based on the type of welding and the materials involved. It typically consists of oxides, silicates, and flux compounds. During welding, the flux coating on the electrode disintegrates, producing gases that help protect the molten metal from oxidation and impurities. As the metal cools, the slag forms and solidifies, encapsulating any impurities and preventing them from affecting the weld’s integrity.
Aiding in Welding Quality
Welding slag serves as a dual-purpose shield. It not only safeguards the molten metal but also contributes to the weld’s structural integrity. The slag’s insulating properties slow down the cooling process, allowing the weld metal to solidify uniformly. This controlled cooling minimizes the risk of cracks and enhances the weld’s mechanical properties, such as strength and toughness.
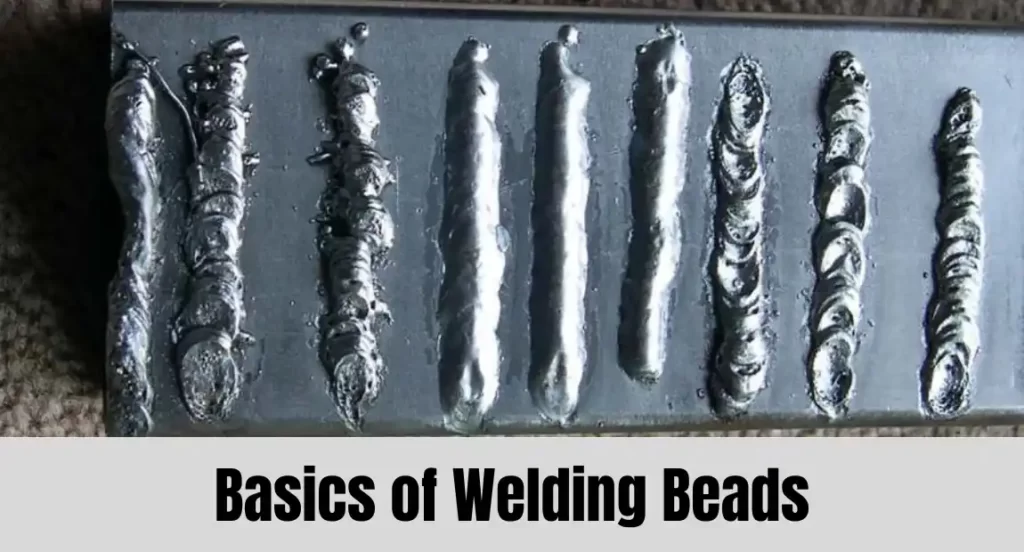
Read More: What is welding beads
The Lifecycle of Welding Slag
Formation: Birth of a Protective Layer
As the welding arc generates intense heat, the electrode’s flux coating disintegrates, releasing gases that shield the molten metal from oxygen and contaminants. Simultaneously, the flux forms a liquid slag that covers the weld pool’s surface.
Solidification: Building Strength and Protection
As the molten metal cools, the slag solidifies into a protective layer. This layer traps impurities, preventing them from affecting the weld. The controlled cooling also promotes uniform solidification of the weld metal, enhancing its structural integrity.
Removal: Revealing the Pristine Weld
After welding, the slag layer is chipped or brushed away using specialized tools. This reveals the clean and sound weld beneath. Proper removal is crucial to ensure the weld’s quality and integrity.
Applications of Welding Slag
Metallurgical Benefits
Welding slag goes beyond its protective role. It contributes to the metallurgical characteristics of the weld. The controlled cooling provided by the slag minimizes the chances of cracking and distortion, resulting in a weld with superior mechanical properties.
Use in Submerged Arc Welding (SAW)
Submerged Arc Welding utilizes a granulated flux that generates a blanket of slag over the weld bead. This slag blanket prevents spatter, provides a controlled environment for the weld, and aids in achieving high-quality joints in various applications.
Surface Cleaning and Abrasive Material
Recycled welding slag finds applications as an abrasive material in industries like shipbuilding and construction. It effectively removes rust, paint, and other contaminants from surfaces, making it an environmentally friendly alternative to traditional abrasive materials.
Methods of Welding Slag Removal
Chipping Method
The chipping method involves using a chipping hammer to carefully remove the solidified slag from the weld bead’s surface. This method requires skill to avoid damaging the weld itself.
Wire Brushing
Wire brushing employs a wire brush to mechanically scrub away the slag layer. This method is effective for lighter slag residues and leaves a clean surface ready for inspection.
Grinding Technique
In this method, a grinding wheel or abrasive disc is used to grind away the slag layer. It’s suitable for thick slag deposits and ensures a smooth, polished finish.
Conclusion: Unveiling the Crucial Role of Welding Slag
In the intricate world of welding, the unassuming welding slag plays a vital role in ensuring strong, clean, and quality welds. From its formation to its applications, we’ve explored the diverse aspects of this essential component. The protective shield it provides, along with its metallurgical benefits, contribute to welds that stand the test of time. As you embark on your welding journey, remember the significance of welding slag in achieving perfection in every weld.
Read More: What is welding beads
FAQs About Welding Slag
Is welding slag harmful to health?
Welding slag, once solidified, is generally not harmful. However, during the welding process, the fumes and gases produced can be hazardous. Proper ventilation and safety measures are essential.
Can I reuse welding slag?
While recycling welding slag is possible, it’s essential to consider its composition and intended use. Some types of slag can be recycled as abrasive materials, but not all slag is suitable for reuse.
Why does slag vary in appearance?
The appearance of welding slag can vary due to factors such as the type of welding, the materials being welded, and the composition of the flux coating. Different metals and fluxes result in different slag colors and textures.
What happens if I don’t remove the welding slag?
Leaving welding slag on a weld can lead to decreased weld quality. The slag can trap contaminants and affect the integrity of the joint, potentially leading to weld defects or failures.
Can slag affect the appearance of the final weld?
Yes, welding slag left on the surface of the weld can impact its appearance. It may result in a rough or uneven surface texture. Proper slag removal ensures a clean and aesthetically pleasing weld.
Are all welding slags the same?
No, welding slags can vary significantly based on factors like the welding process, the materials used, and the type of flux coating. Different types of slag have distinct characteristics and purposes.
James is a welding expert, accomplished author, and trusted guide with over 8 years of experience in the industry. With his in-depth knowledge and engaging writing style, James has become a true authority in the field, offering readers and clients invaluable expertise and insights to take their welding skills to new heights.
by James | Aug 21, 2023 | Welding
Aluminum is a versatile and widely used material in various industries, from aerospace to automotive manufacturing. When it comes to welding aluminum, proper surface preparation is essential for achieving strong and reliable welds. Cleaning aluminum before welding not only ensures the quality of the weld but also prevents potential defects and failures. In this guide, we will walk you through the step-by-step process of how to clean aluminum before welding, ensuring optimal results for your welding projects.
Why Cleaning Aluminum Before Welding Matters
Aluminum has a thin layer of oxide on its surface that forms naturally when exposed to air. This oxide layer can hinder the welding process by preventing proper fusion between the base metal and the filler material. Incomplete fusion can lead to weak joints, cracks, and other defects that compromise the integrity of the weld. By thoroughly cleaning the aluminum surface before welding, you remove this oxide layer and any contaminants that may be present, creating ideal conditions for successful welding.
Read More: Can You Weld Aluminum With Flux Core
Step-by-Step Guide to Cleaning Aluminum Before Welding
- Select the Right Cleaning Agent: Begin by choosing a suitable cleaning agent. Common options include acetone, isopropyl alcohol, or a specialized aluminum cleaning solution. These solvents effectively remove oils, dirt, and contaminants that could hinder the welding process.
- Safety Precautions: Wear appropriate personal protective equipment (PPE), including gloves and safety glasses, when handling cleaning agents. Work in a well-ventilated area to avoid inhaling fumes.
- Remove Surface Contaminants: Use a clean cloth or rag soaked in the chosen cleaning agent to wipe the aluminum surface. Focus on removing oils, grease, dust, and any other visible contaminants. Make sure to clean all areas that will be part of the weld joint.
- Scrubbing and Brushing: For more stubborn contaminants, you may need to use a soft-bristle brush or abrasive pad. Gently scrub the surface to loosen and remove any residue. Avoid using abrasive materials that could scratch the aluminum.
- Rinse and Dry: After scrubbing, rinse the aluminum thoroughly with clean water to remove any remaining cleaning agent. Ensure that no cleaning agent residue is left on the surface. Allow the aluminum to dry completely before proceeding.
- Degrease: If there are still traces of grease or oil after the initial cleaning, you can use a degreasing solvent or a dedicated aluminum degreasing solution. Apply the degreaser according to the manufacturer’s instructions, and rinse and dry the aluminum afterward.
- Aluminum Brushing: Some professionals recommend using a stainless steel brush designed specifically for aluminum. Brushing the aluminum surface helps remove the oxide layer and any remaining contaminants. Brush in one direction to achieve a consistent finish.
- Flux and Filler Material: Depending on the welding method you’re using, applying flux or using a filler material with cleaning properties can aid in removing oxide and impurities during the welding process.
Read More: What Should You Use to Clean Hand and Power Tools?
Benefits of Properly Cleaned Aluminum Surfaces for Welding
- Stronger Welds: Welding on a clean aluminum surface ensures that the weld joint is free from contaminants and oxide layers, resulting in a strong and solid weld.
- Reduced Defects: Clean aluminum reduces the likelihood of defects such as porosity, incomplete fusion, and cracks, which can compromise the quality of the weld.
- Improved Aesthetics: A clean weld joint contributes to a visually appealing finished product, especially in applications where appearance matters.
- Enhanced Welding Performance: Properly prepared aluminum surfaces provide better conductivity, leading to improved arc stability and weld consistency during the welding process.
- Longevity and Durability: Well-cleaned and properly welded aluminum joints are more likely to withstand the test of time, resisting corrosion and structural failure.
How to Clean Metal Before Welding
Cleaning metal before welding is a critical preparatory step that directly impacts the quality and integrity of the weld. Effective cleaning removes surface contaminants like dirt, oil, rust, and oxides, ensuring proper fusion between the base metal and the filler material. Begin by removing visible debris using a cloth or wire brush, followed by a cleaning agent like acetone to eliminate oils and greases.
Thoroughly rinsing and drying the metal is essential to prevent residual contamination. A clean metal surface provides optimal conditions for a strong and reliable weld, minimizing the risk of defects such as porosity and weak joints. Investing time in meticulous metal cleaning contributes to welds that meet industry standards and deliver exceptional performance in various applications.
How to Clean Steel Before Welding
Properly cleaning steel surfaces before welding is essential to achieve optimal weld quality and integrity. To prepare the steel for welding, start by removing any visible contaminants, such as dirt, oil, and rust, using a wire brush or abrasive pad. Next, use a degreasing solvent or a suitable cleaning agent to eliminate residual oils and grease that could hinder the welding process.
Ensure that the steel is thoroughly rinsed with clean water and dried to prevent any leftover cleaning agent residue. This process helps to create a clean and bare metal surface, free from impurities, which is crucial for achieving strong and durable welds. By investing time in thorough surface preparation, welders can minimize the risk of defects, porosity, and weld discontinuities, ensuring that the welded joints exhibit optimal strength and performance.
Read More: Can You Weld Stainless Steel With Flux Core
Conclusion
Cleaning aluminum before welding is a crucial step that significantly impacts the quality and strength of the weld. By removing oxide layers and contaminants, you create the ideal conditions for successful welding and long-lasting results. Remember to select the appropriate cleaning agents, follow safety precautions, and take your time to ensure thorough cleaning. By investing time in proper surface preparation, you’ll achieve welds that not only meet industry standards but also exceed your expectations for quality and durability. I hope this how to clean aluminum before welding guide will help you in getting better results.
James is a welding expert, accomplished author, and trusted guide with over 8 years of experience in the industry. With his in-depth knowledge and engaging writing style, James has become a true authority in the field, offering readers and clients invaluable expertise and insights to take their welding skills to new heights.
by James | Aug 20, 2023 | Welding
Welding, brazing, and soldering are distinct metal joining techniques, each with unique characteristics and applications. Welding involves melting the base materials and a filler metal, creating a strong fusion when cooled. It’s ideal for permanent joints in structural and industrial settings, often yielding high-strength connections.
Brazing, on the other hand, uses a filler metal with a lower melting point than the base materials. The filler flows into the joint through capillary action, forming a durable bond without melting the base metals. This method suits dissimilar metals and delicate components, producing joints with excellent integrity.
Soldering employs an even lower-melting-point filler metal, typically applied to electrical or electronic connections. The filler forms a thin layer that adheres to the surfaces, facilitating electrical conductivity. Unlike welding and brazing, soldering doesn’t create a robust mechanical bond, making it reversible.
Ultimately, the choice among welding, brazing, and soldering depends on factors such as joint strength, material compatibility, application requirements, and desired permanence.
Read More: Pros and Cons of Welding
What is Welding
Welding is a fundamental metalworking process that involves joining two or more pieces of metal by melting their surfaces and allowing them to fuse together as they cool. Utilizing intense heat, often generated by an electric arc or a gas flame, welding achieves a strong and permanent bond between metals, enabling the creation of complex structures and products.
This technique finds applications across industries, from manufacturing and construction to aerospace and automotive sectors, playing a crucial role in building everything from intricate artistic sculptures to heavy-duty machinery. Welding’s versatility and strength make it an indispensable tool in modern engineering and fabrication.
What is Soldering
Soldering is a precise and versatile metal joining technique used across various industries. It involves melting a filler metal, typically with a lower melting point, to create a bond between two base materials. Unlike welding, soldering doesn’t melt the base materials but rather forms a solid connection through capillary action.
Commonly employed in electronics, plumbing, and jewelry-making, soldering ensures secure, conductive, and often reversible bonds. The process demands meticulous control of temperature and flux application to achieve reliable joints, making soldering an indispensable method for assembling intricate components and delicate materials.
What is Brzaing
Brazing is a metal joining process that involves melting a filler metal with a lower melting point than the base metals being joined. Utilizing capillary action, the molten filler metal is drawn into the joint, creating a strong bond upon solidification. Unlike welding, where the base metals melt and fuse together, brazing retains the original properties of the base metals while forming a secure connection.
This technique is preferred for joining dissimilar metals or materials with different melting points. Brazing finds applications in industries ranging from jewelry making to manufacturing intricate components in electronics and even constructing resilient connections in plumbing and HVAC systems.
Read More: What is Cold Welding
Differentiate Welding, Brazing and Soldering on the Basics of Their Properties
Welding, soldering, and brazing are three distinct methods of joining metals, each with its own set of properties and applications. Let’s compare them based on factors like strength, temperature, and other relevant characteristics:
Strength:
Welding: Welding creates the strongest joint among the three. It involves melting the base metals and often adding a filler material to create a fusion bond. The resulting joint is typically as strong as, or even stronger than, the base metals themselves.
Soldering: Soldered joints are relatively weaker compared to welded joints. Soldering relies on a lower-melting-point filler material (solder) that does not create a metallurgical bond but rather forms a mechanical connection.
Brazing: Brazing produces joints that are stronger than soldered joints but generally not as strong as welded joints. The filler material used in brazing has a higher melting point than solder and forms a stronger bond through capillary action.
Temperature:
Welding: Welding involves high temperatures, often exceeding the melting points of the base metals. This can lead to metallurgical changes in the materials being joined.
Soldering: Soldering is conducted at lower temperatures, typically below 450°C (850°F). This prevents damage to sensitive materials while achieving a bond.
Brazing: Brazing occurs at intermediate temperatures between soldering and welding, usually around 450°C to 850°C (850°F to 1560°F), depending on the filler material used.
Metallurgical Changes:
Welding: Due to high temperatures, welding can cause significant metallurgical changes in the base metals, affecting their properties and potentially creating zones of heat-affected material.
Soldering: Soldering does not cause significant metallurgical changes, as it operates at lower temperatures that do not significantly alter the base metals.
Brazing: Similar to soldering, brazing also has a minimal metallurgical impact on the base metals, but the higher temperatures can result in some heat-affected zones.
Materials Compatibility:
Welding: Welding is generally suitable for joining similar or dissimilar metals, depending on the specific welding process used.
Soldering: Soldering is typically used for electronic components, jewelry, and delicate items, as it’s well-suited for joining materials with similar properties and low melting points.
Brazing: Brazing is commonly used to join dissimilar metals with varying melting points, offering a compromise between the high strength of welding and the lower temperatures of soldering.
Welding provides the highest joint strength but requires high temperatures and can lead to metallurgical changes. Soldering is ideal for delicate applications and electronics but results in weaker joints. Brazing offers a balance between strength and temperature, making it suitable for joining a wide range of materials while avoiding extreme temperatures and significant metallurgical changes.
Final Words
In the intricate world of metal joining techniques, the distinctions between welding, brazing, and soldering are pivotal. Welding, with its formidable strength through material fusion, stands tall as the epitome of robust bonding. Meanwhile, brazing bridges the gap between strength and compatibility, uniting disparate metals with a tenacious grip. Soldering, delicate yet precise, finds its niche in electronics and intricate craftsmanship.
This exploration of their properties underscores the significance of selecting the right technique for diverse applications. Whether it’s the molten melding of welding, the capillary connection of brazing, or the intricate finesse of soldering, each method leaves its indelible mark in the world of metal fabrication.
Read More: What is Arc Welding
James is a welding expert, accomplished author, and trusted guide with over 8 years of experience in the industry. With his in-depth knowledge and engaging writing style, James has become a true authority in the field, offering readers and clients invaluable expertise and insights to take their welding skills to new heights.
by James | Aug 14, 2023 | Product Reviews
Welding is a critical process in various industries, including construction, manufacturing, and oil and gas. One of the essential tools for welders is the welding hood, which not only protects them from sparks, debris, and harmful light but also contributes to their overall efficiency and comfort. Sugar scoop welding hoods are different but closely match custom pipeliner hoods.
Among the various types of welding hoods available, the pipeliner welding hood stands out as a specialized solution designed to meet the unique needs of pipeline welders. In this article, we’ll explore the features, benefits, and significance of the custom pipeliner welding hood, often referred to as the pipeliner welding helmet.
Understanding the Custom Pipeliner Welding Hood
The custom pipeliner welding hood, also known as the pipeliner welding helmet, is a specialized piece of personal protective equipment (PPE) designed explicitly for pipeline welding tasks. It is built to provide optimal protection to welders working in confined spaces, such as pipelines, where traditional welding helmets might not be as effective.
The design of the pipeliner hood takes into consideration the specific challenges faced by pipeline welders, such as limited visibility, tight spaces, and the need for increased mobility. We have also covered tight space welding helmets so you can also choose according to your needs.
Key Features of the Pipeline Welding Hood
Enhanced Visibility:
One of the standout features of the custom pipeliner hood is its unique design that offers improved visibility compared to standard welding helmets. The hood is engineered with a larger, wraparound lens that extends the field of vision, allowing welders to see their work clearly even in cramped spaces.
Auto-Darkening Technology:
Many pipeliner welding hoods come equipped with auto-darkening technology. This technology ensures that the lens automatically adjusts its shade according to the intensity of the welding arc. This feature not only reduces eye strain but also enhances safety by preventing accidental exposure to harmful UV and infrared rays.
Lightweight and Ergonomic:
The design of the custom pipeliner hood focuses on providing comfort and reducing fatigue during long welding sessions. The lightweight and ergonomic design allows welders to move their heads freely without feeling weighed down.
Durability:
Given the demanding nature of pipeline welding, these hoods are built to withstand harsh conditions. They are often constructed from durable materials that can resist sparks, heat, and impact.
Chopped Pipeliner Hood:
The term “chopped pipeliner hood” refers to a modified version of the standard pipeliner hood. In this variation, the top part of the hood is trimmed or “chopped” to provide better upward visibility. This modification can be particularly useful when welding in positions that require looking upward, such as when welding overhead pipes. There is also another type called minion welding hood that is also liked by many enthusiast welders.
Benefits of Using a Custom Pipeliner Hood
Safety:
Safety is of paramount importance in welding, and the custom pipeliner hood enhances safety by providing full coverage to the face, neck, and head. The auto-darkening feature also prevents arc flashes that can lead to eye injuries.
Efficiency:
The enhanced visibility and auto-darkening technology of the pipeliner hood contribute to increased welding efficiency. Welders can accurately see their work, resulting in better weld quality and reduced rework.
Comfort:
Welding in confined spaces can be uncomfortable, but the ergonomic design of the custom pipeliner hood minimizes discomfort. The lightweight nature of the hood ensures welders can work for extended periods without strain. Here is the list of cool welding helmets that you liked the most.
Adaptability:
The chopped pipeliner hood variant demonstrates the adaptability of these hoods to specific needs. Welders can customize their hoods to suit their working conditions and preferences, making the welding experience more personalized.
Choosing the Right Pipeliner Welding Hood
When selecting a pipeliner welding hood, consider the following factors:
Auto-Darkening Feature: Opt for a hood with auto-darkening technology to ensure optimal eye protection.
Durability: Look for a hood made from sturdy materials that can withstand the demands of pipeline welding.
Visibility: Choose a hood with a wide lens and, if needed, explore the chopped pipeliner hood variant for improved upward visibility.
Comfort: Prioritize lightweight and ergonomic designs to minimize discomfort during long welding sessions.
Customization: If you have specific requirements, consider a custom pipeliner hood that can be tailored to your needs.
Conclusion
The custom pipeliner welding hood, also known as the pipeliner welding helmet, is a specialized tool that plays a crucial role in enhancing the safety, efficiency, and comfort of pipeline welders. With features such as improved visibility, auto-darkening technology, and adaptability, these hoods are designed to meet the unique challenges of pipeline welding tasks.
Whether you opt for the standard design or the chopped pipeliner hood variant, investing in a high-quality custom pipeliner welding hood is a decision that welders can make with confidence, knowing that it will contribute to their overall welding experience and well-being.
James is a welding expert, accomplished author, and trusted guide with over 8 years of experience in the industry. With his in-depth knowledge and engaging writing style, James has become a true authority in the field, offering readers and clients invaluable expertise and insights to take their welding skills to new heights.
by James | Aug 2, 2023 | Welding
Wiring a 4-prong 220v plug with 3 wires is a task that many DIYers take on to power large appliances and tools that require a 220v circuit. Properly wiring a 220v outlet is critical for safety and ensuring your devices function properly. In this guide, I’ll walk you through the complete step-by-step process of How to Wire a 4-Prong 220v Plug with 3 Wires.
What You’ll Need
- 4-prong 220v plug
- 3 wires (hot, neutral, ground)
- Wire strippers
- Screwdriver
- Voltage tester
Step 1: Turn Off Power at Breaker Box
Before doing any electrical work, you’ll want to turn off the circuit breaker for the 220v outlet you’ll be wiring. Verify power is off by testing the outlet with a voltage tester. This is an important safety step.
Step 2: Remove Cover Plate from 220v Outlet Box
With the power off, use a screwdriver to remove the cover plate from the 220v outlet box you’ll be wiring. Place the cover plate and screws aside so you can reinstall it later.
Step 3: Strip the Ends of the 3 Wires
Use your wire strippers to strip about 1/2 inch of insulation from the ends of the 3 wires you’ll be connecting:
- Hot wire (black)
- Neutral wire (white)
- Ground wire (green or bare copper)
Stripping the insulation properly is key to making solid electrical connections.
Step 4: Connect the Hot Wires
Inside the 220v outlet box, you should see two hot wires, typically black. Use a wire nut to connect the black hot wire from your plug to the two hot outlet wires. Wrap the connection clockwise and make sure it is secure.
Step 5: Connect the Neutral Wire
Find the white neutral outlet wire and connect it to the white wire from your plug using a wire nut. Wrap the connection clockwise securely.
Step 6: Connect the Ground Wire
Locate the ground outlet wire, which will be green or bare copper. Connect it to the ground wire from your new plug using a wire nut, securing the connection fully.
Step 7: Arrange Wires and Install Plug
Carefully arrange the wires and push into the outlet box. Install the new 220v plug into the outlet box opening and screw it in place securely.
Step 8: Reinstall Cover Plate
Put the outlet cover plate back on over the plug and use the screws to secure it in place. This completes the installation.
Step 9: Turn Power Back On and Test
Head back to your breaker box and turn the 220v circuit breaker back on. Use a voltage tester to confirm power is flowing properly to the outlet. Test your plug by plugging in a 220v appliance and turning it on to verify it works correctly.
And that covers the entire process for safely wiring a new 4-prong 220v plug with 3 wires! Taking the time to follow these steps will ensure you have a properly wired plug that delivers the 220v power your appliances require.
Some Useful Tips on How to Wire a Plug with 3 Wires:
- Always turn off the power at the breaker box before you start wiring. This will help to prevent electrical shock.
- Use the correct size wire strippers for the wires you are working with. This will help to ensure that the insulation is stripped away without damaging the wires.
- Make sure that the connections are tight and secure. Loose connections can cause arcing, which can start a fire.
- Wrap electrical tape around each connection. This will help to insulate the connections and prevent them from coming loose.
- Be careful not to touch the exposed wires with your bare hands. This can cause electrical shock.
- If you are not comfortable wiring the plug yourself, you should hire a qualified electrician to do it for you.
Here are Some Additional Tips:
- Use a wire stripper with a built-in measuring guide to ensure that you strip the insulation the correct amount.
- Use a high-quality electrical tape that is rated for high voltage.
- Label the wires with electrical tape so that you know which wire goes where.
- Test the plug after you have wired it to make sure that it is working properly.
By following these tips, you can wire a plug with 3 wires safely and correctly.
FAQs
How do I know if my appliance needs a 4-prong plug?
The best way to know if your appliance needs a 4-prong plug is to check the appliance’s owner’s manual. The manual will specify the voltage and amperage requirements for the appliance. If the appliance requires 220 volts and 50 amps, it will need a 4-prong plug.
Can I use a 3-prong plug instead of a 4-prong plug?
No, you should not use a 3-prong plug instead of a 4-prong plug. A 3-prong plug is not designed to carry the amount of current that a 4-prong plug can carry. Using a 3-prong plug in place of a 4-prong plug could create a fire hazard.
What happens if I connect the neutral wire to the wrong prong on the plug?
If you connect the neutral wire to the wrong prong on the plug, it could create a shock hazard. The neutral wire is connected to the ground wire at the breaker box, so if the neutral wire is connected to the wrong prong on the plug, it could create a path for electricity to flow through the appliance and into the user.
Conclusion
Wiring a 4-prong 220v plug with 3 wires is a relatively simple task, but it is important to make sure that the connections are made correctly to avoid a fire hazard. If you are not comfortable wiring the plug yourself, you should hire a qualified electrician to do it for you.
James is a welding expert, accomplished author, and trusted guide with over 8 years of experience in the industry. With his in-depth knowledge and engaging writing style, James has become a true authority in the field, offering readers and clients invaluable expertise and insights to take their welding skills to new heights.