Wiring a 4 prong 220V plug when you only have 3 wires is a situation that often comes up when replacing an appliance cord or upgrading to a newer plug style. Many older circuits were installed with only three conductors, while modern 4 prong plugs require two hot wires, one neutral, and one ground.
In some cases, this conversion can be done safely. In others, it should not be attempted. The key is understanding what each wire does, whether your appliance requires a neutral, and what your local electrical code allows. Because 220 volts can cause serious injury or death, this work should only be performed if you are confident using electrical tools and testing equipment.
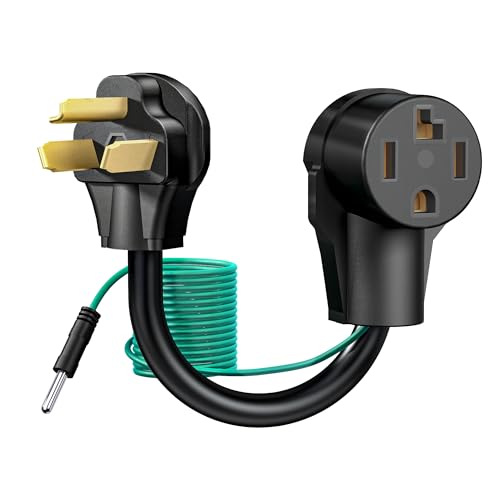

Table of Contents
Important Safety Precautions
Before touching any wires, turn off the breaker supplying the circuit. After switching it off, confirm that power is actually disconnected using a multimeter. Do not rely solely on flipping the breaker or using a non contact tester.
Make sure the plug rating matches the breaker size. Inspect the cable for cracked insulation, burn marks, or corrosion. If any damage is present, replace the cable instead of reusing it.
Never modify wiring in a way that contradicts the appliance manufacturer’s instructions or your local electrical code.


Understanding the Terminals on a 4 Prong Plug
A typical 4 prong 220V plug, such as a NEMA 14-30 or NEMA 14-50, contains four terminals.
Hot Terminal X
This is one of the two energized conductors. It is usually a brass colored screw.
Hot Terminal Y
This is the second energized conductor and is also brass colored. Between X and Y, you measure approximately 240 volts.
Neutral Terminal (W or N)
This terminal is typically silver colored. It carries return current for any 120 volt components inside the appliance, such as lights, timers, or control boards.
Ground Terminal (G)
The ground terminal is usually green. It does not normally carry current. Instead, it provides a safe path to ground if a fault energizes the metal housing of the appliance.
It is important to understand that neutral and ground serve different purposes and should not be treated as interchangeable conductors in modern installations.
Identifying Your Three Wire Configuration
Before wiring the plug, determine which three conductors you have in your cable.
Two Hots and Ground (No Neutral)
This configuration is common for pure 240 volt circuits. You will typically see a black wire, a red wire, and a bare or green wire. There is no white neutral conductor.
This setup is suitable only for appliances that operate exclusively on 240 volts and do not require 120 volt components.
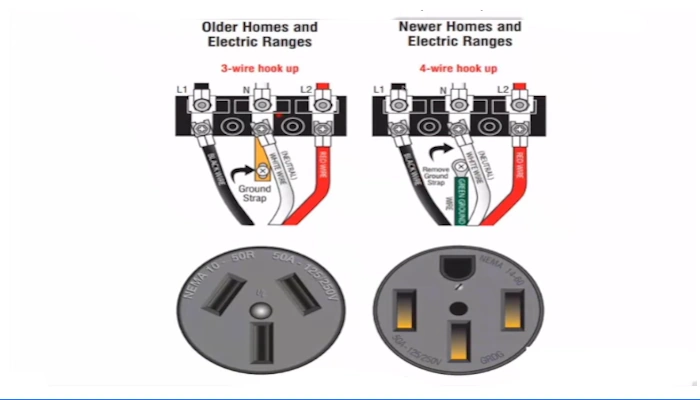
Two Hots and Neutral (No Separate Ground)
This is commonly found in older dryer and range circuits. You will typically see black, red, and white conductors. In older systems, the neutral was sometimes used as both the neutral and equipment ground.
Your wiring approach depends entirely on which configuration you have and whether your appliance requires a neutral conductor.


Scenario 1: Wiring Two Hots and Ground to a 4 Prong Plug
This scenario applies only to pure 240 volt appliances such as certain welders, air compressors, or heating elements that do not require a neutral.
First, strip back the outer jacket of the cable to expose about six inches of conductors. Strip approximately three quarters of an inch of insulation from each hot wire.
Open the plug housing and identify the labeled terminals. The two brass screws are the hot terminals marked X and Y. The silver screw is neutral. The green screw is ground.
Connect one hot wire to X and the other to Y. The order does not matter. Tighten the screws firmly so the wires are secure.
Attach the bare or green wire to the ground terminal marked G.
Leave the neutral terminal unused. Since no neutral is present and the appliance does not require one, it should remain empty.
Secure the strain relief so that it clamps the outer cable jacket, not the individual wires. This prevents tension from pulling on the terminals.
After restoring power, use a multimeter to confirm approximately 240 volts between the two hot blades and about 120 volts between each hot and ground. The neutral blade should show no voltage.
Scenario 2: Wiring Two Hots and Neutral with No Separate Ground
This situation appears in older installations where only three insulated conductors were run. Modern code generally requires a separate ground conductor for new work, but older installations may allow certain configurations if permitted by local regulations.
Confirm that you have black and red hot wires and a white neutral wire. If a bare or green conductor is also present, you actually have four wires and should wire them separately without bonding.
Connect the black wire to X and the red wire to Y.
Attach the white wire to the neutral terminal marked W or N.
If local code and the appliance manufacturer permit bonding neutral and ground in an existing installation, a short jumper of the same gauge wire may be installed between the neutral and ground terminals inside the plug. This practice is generally limited to legacy systems and is not recommended for new installations.
If bonding is not permitted, the correct solution is to run a separate equipment grounding conductor back to the panel.
After completing connections, secure the strain relief and reassemble the plug. Restore power and verify voltage readings. You should measure approximately 240 volts between hot terminals and about 120 volts between each hot and neutral.
Determining Whether Your Appliance Requires a Neutral
Never assume that a neutral is unnecessary. Check the appliance nameplate and wiring diagram.
Appliances labeled 120/240 volts typically require a neutral because they contain internal 120 volt components. Dryers with interior lights and electronic controls are common examples.
Appliances that operate strictly on 240 volts without electronics may not require a neutral. Certain welders, compressors, and heating elements fall into this category.
Connecting an appliance that requires a neutral to a circuit without one can cause malfunction, erratic operation, or permanent damage.
Common Wiring Mistakes
One common mistake is confusing neutral and ground. While they are bonded at the main service panel, they perform different functions in branch circuits.
Another mistake is using a plug or cord rated for fewer amps than the breaker protects. This can create overheating and fire hazards.
Loose terminal screws are also dangerous. Even slightly loose connections can produce heat and arcing over time.
Failing to secure the strain relief properly can allow movement of the cable, eventually loosening internal connections.
When You Should Not Attempt This Conversion
You should not proceed if your appliance requires a neutral but your cable does not provide one. You should also avoid proceeding if local code prohibits neutral and ground bonding in your situation.
If the conductors show signs of overheating, corrosion, or physical damage, replace the cable rather than attempting to reuse it.
If you do not have a multimeter or are unsure how to verify voltage readings, this is not a safe project to attempt without professional assistance.
Conclusion: How to Wire a 4 Prong 220V Plug with 3 Wires
Wiring a 4 prong 220V plug with 3 wires can be done safely only when the wiring configuration matches both the appliance requirements and current electrical code.
If you have two hots and a ground and the appliance is a pure 240 volt load, connect the two hot wires to X and Y and the ground to G, leaving neutral unused.
If you have two hots and a neutral in a legacy installation and bonding is permitted, connect neutral to the W terminal and address grounding according to code and manufacturer instructions. However, installing a dedicated ground conductor remains the safer and more modern solution.
At every step, confirm power is off before working, tighten all connections securely, and test the completed wiring with a multimeter before plugging in the appliance. When in doubt, contacting a licensed electrician is the safest decision.

James is a welding expert, accomplished author, and trusted guide with over 8 years of experience in the industry. With his in-depth knowledge and engaging writing style, James has become a true authority in the field, offering readers and clients invaluable expertise and insights to take their welding skills to new heights.